Sunday, December 30, 2012

Wine Bottle Vases


I thought I would post the wine bottles I have upcycled this week. I took 3 wine bottles and 1 one large 1.75 liter liquor bottle my uncle gave me and made them into vases or just beautiful home decor items.

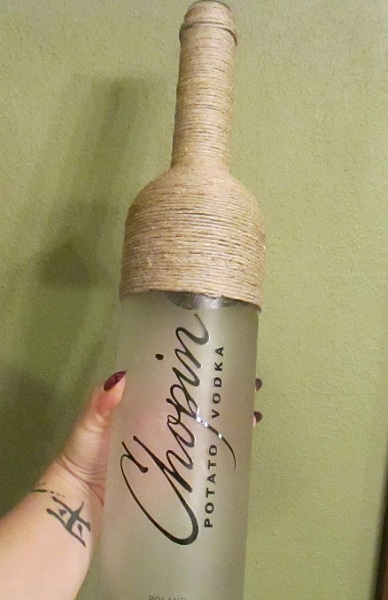
The first bottle i'm going to show you is one that I am currently working on. This is another large 1.75 liter bottle. As you can see I left the bottle the way it was. I have just added glue in sections about 3" at a time. I wrap the hemp twine closely and tightly and work my way down.


This next picture is the large 1.75 liter bottle that I have that is finished. I also added a white glitter twig in the top to show how it can be used. I made a burlap flower and added lace trim around the middle to dress it up.


This next one is a regular sized wine bottle that has been wrapped in the same natural hemp with lace trim and white flowers this time.


This one is brown and I ran out of the brown hemp at the very bottom, so I decided to go with a white hemp for the bottom to give it a unique look. I brought that white up by adding some white flowers and also added some brown sprigs. I really like how this turned out.
 

My last one is great for summer or fall. I used 3 different colors. Red, dark orange, and light orange. Then I tied in all the colors with a cluster of flowers. They are glued to a felt circle I cut out, it helps to keep them attached to the bottle better. All the flowers on the bottles above have felt backs for that purpose.


Well they are. I hope you like them. I hope to list them to my shop very soon. I want to make sure I have proper boxes on hand for shipping them first. Thank you for coming by and taking a look.


Thursday, December 13, 2012

Wire Jewelry Display Racks

 
Good morning. I thought I would share my home craft for storing and displaying a lot of my jewelry while it waits to be sold.
 
My husband and I went to Lowes in the lawn and garden section where all the fencing is. I choose a roll of wire with about 1 inch square hole. This makes it small enough to add a huge variety but the holes are also big enough so that you are not snagging pieces as you remove them.


My husband also used the 8ft pieces of wood he had on hand. They are 1 1/2" wide and 3/4" thick. He cut the wire to my measurements. I also wanted them roughly the same length as my mirror so they would look good all displayed together.


He stapled the wire to the wood. Now you don't want to hang it just like that, even with the wire back facing the wall because then the wire will be flush to the wall and the backs of the earrings won't lay right. So he took more wood. Same dimensions but thinner and laid it over the exposed wire.

 
I then painted the wood in a teal blue. I also took a bit of pink and went over the wire lightly for a bit of colorful contrast, because I'm a woman and I like color....lol.


So here it is again all finished. I used S hooks on the rack to hang up bracelets. Bigger ones are good for the bigger bead and multiple strand bracelets. My husband also screwed the racks to the wall. You see the exposed holes now, but I did cover them afterwards with large rhinestones. I also may paint some designs on the wood in the future.

You can also make smaller ones to display personal jewelry and even add a fabric back for a more unique look. They would even be a great gift. The roll of wire was only around $10 so not very expensive to make at all. I am not sure the cost of the wood as we had it on hand. It was a lot of fun to design and make. I really love how it looks in my studio. My next home project I think will be a framed in sheet metal panel to hold and display the various magnets I make.

Wednesday, December 12, 2012

12/12/12

Good morning! Today is 12/12/12! So today I will showcase 12 of my pieces of jewelry that I have made and that are currently for sale over at my Etsy shop! This way you can get an idea of the types of things I make and sell. So here we go!


                                               1) Purple Double Strand Flower Necklace.


2) Chunky Mixed Bracelet
 
 
3) Pink Glitter Glass Ring
 
 
4) Pink Glass Pearl Drop Fan Necklace
 
 
5) Gold Plated Rhinestone Om Silk Wrap Bracelet
 
 
6) Lavender & Gold Plated Necklace
 
 
7) Bottomless Sandals In Blue, Green, & Purple
 
 
8) Black & Grey Flower Necklace
 
 
9) Sea Green Glass Pearl Rosary
 
 
10) Pale Pink Chunky Necklace
 
 
11) Black & White Rhinestone & Glass Pearl Bracelet
 
 
12) Flower Necklace In Black, Blue, & Green


Thank you so much for taking a look today. I hope you enjoyed what you saw. If you would like to see more items you can check out my Etsy shop. www.etsy.com/shop/spiritualpathways
~Amy~

Tuesday, December 11, 2012

Snowman Wine Glass Candle Holder

Hello everyone and welcome. This is my very first attempt at blogging! So please be patient with me as learn my way around here....lol.

I thought for my first blog I would show today's craft project. I painted a wine glass today. I made it look like a snowman. I flipped it upside down so that I could actually use it as a candle holder. If you are familar with other craft sites or even pinterest, I am sure you have seen them before.

This is an up close picture of his face. I used enamel glass paints I picked up from Wal-Mart. I let each layer dry before adding another to make sure the colors don't bleed.


I then baked it according to the bottles instructions. Placing it in a cool oven and then heating oven to 350 degrees and baking for 30 mins.

I even decided to make the bottom of the glass (which becomes the top where the candle sits) into a cute snowflake.

Overall I am happy with how it came out. My daughter really likes it. I plan on making more for other holidays as well. I amy even decide to make some to sell in my shop in the future. ;)

Well thank you very much for stopping by and checking out my first ever entry and I hope you enjoyed it.

Amy