Wednesday, February 20, 2013

Paper Beads

I know it has been a while. I have had lots of projects going on. I thought I would share one of them.


Paper beads.
These are some finished beads. Colored with permanent markers for a great neon pallet! I started out with some paper cut into either rectangle strips for tube beads, or triangle strips for the beads pictured above.
I colored the edges of the paper. The center will be hidden so no need to waste ink. (This is not a full tutorial but rather an overview. If you would like full instructions you can find lots on YouTube, which is where I found out how to make mine)

 
I had a variety of materials laid out. Glue for the ends of the paper. Tooth picks to roll paper on to. I have purchased a paper bead roller since then and it was worth it! It was only like $6.00 on eBay and made the process 10x faster! I also had a foam block to place tooth picks on while they dry and also diamond glaze to seal the beads.


I rolled the paper onto the toothpick and placed a dab of glue on the end to seal it. This is what a triangle piece of paper looks like rolled up.


This is some of the beads sitting in the foam block after getting a coat of diamond glaze. I poured some in an old shot glass and used a tiny paint brush to glaze them. Once they dried for about 5 minutes I put another coat on them. After they dried again, I simply twisted them to loosen them and pulled them off the toothpicks.                       


                                                  These are some finished stripped ones.


These are some finished tube ones using just plain scrapbooking paper in its natural state. The floral print was small and pretty enough to show up on the bead. I then turned them into earrings. I hope to use the beads in more crafts and jewelry down the road and make many more color combos and styles. I hope you enjoyed this post. Thank you for stopping by. If you are interested in purchasing the earring shown, they can be found in my Etsy shop: http://www.etsy.com/shop/SpiritualPathways


Monday, January 14, 2013

Wine Cork Projects

 
I showed you my wine bottle project and now I want to show you what I make and sell using wine corks! I have people give me corks, I will collect a few I use, but I only get about 2-3 a month. I also purchase wine corks.


This is pretty simple. Wine cork key chains! I have so far made them in 2 different styles. Ones with buttons and ones with beads on the ends.


                    I added some colorful buttons to the end of a synthetic cork for added flair.


I also added a washer and eye pic to attach the keyring too.
 
This is the finished outcome.


The next one is a beaded version. I glued glass beads to eye pins and inserted them with glue on them into the wine corks.

 
This nect project is wine cork ornaments or window charms. Depends on the person and time of year of how they can be used.


I again used eye pins with glue on them and twisted them into the corks. I then added colorful beaded dangles to the bottom and even added a bead to the top to tie it all in.
 
 
Here you can see I added a cool swirled hook. Perfect for hangin on a Christmas tree or hooking onto a suction cup. (which I provide when you purchase these from me)
 
 
I am always looking for ways to recycle items and turn them into something unexpected. I also make wine bottle charms and wine glass charms for parties. Anywhere I can add fun and flair, I will! lol.

I hope you enjoyed checking out these wine cork crafts. I have many more in other colors. If you are interested in purchasing them you can find them here in my Etsy shop! Thank you for stopping by. http://www.etsy.com/shop/SpiritualPathways

Sunday, December 30, 2012

Wine Bottle Vases


I thought I would post the wine bottles I have upcycled this week. I took 3 wine bottles and 1 one large 1.75 liter liquor bottle my uncle gave me and made them into vases or just beautiful home decor items.

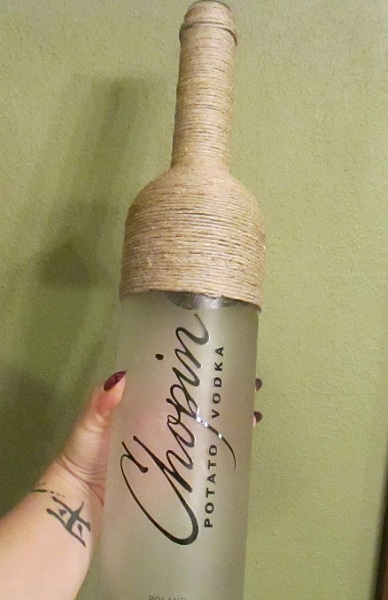
The first bottle i'm going to show you is one that I am currently working on. This is another large 1.75 liter bottle. As you can see I left the bottle the way it was. I have just added glue in sections about 3" at a time. I wrap the hemp twine closely and tightly and work my way down.


This next picture is the large 1.75 liter bottle that I have that is finished. I also added a white glitter twig in the top to show how it can be used. I made a burlap flower and added lace trim around the middle to dress it up.


This next one is a regular sized wine bottle that has been wrapped in the same natural hemp with lace trim and white flowers this time.


This one is brown and I ran out of the brown hemp at the very bottom, so I decided to go with a white hemp for the bottom to give it a unique look. I brought that white up by adding some white flowers and also added some brown sprigs. I really like how this turned out.
 

My last one is great for summer or fall. I used 3 different colors. Red, dark orange, and light orange. Then I tied in all the colors with a cluster of flowers. They are glued to a felt circle I cut out, it helps to keep them attached to the bottle better. All the flowers on the bottles above have felt backs for that purpose.


Well they are. I hope you like them. I hope to list them to my shop very soon. I want to make sure I have proper boxes on hand for shipping them first. Thank you for coming by and taking a look.